티스토리 뷰
iOS 15 에서 UIButton 에 새로생긴 UIButton.Configuration 에 대해서 알아보자!
먼저, 개발자문서를 따라가면서 버튼을 만드는 방법에 대해서 알아보자.
Creating Buttons
Creates a new button with the specified frame.
✨init(frame: CGRect, primaryAction: UIAction?)
Creates a new button with the specified frame, registers the primary action event, and sets the title and image to the action’s title and image.
iOS14 부터 사용가능한 생성자이다! UIAction 을 통해서 버튼의 액션을 부여할 수 있기 때문에 더이상 selector 를 사용하지 않고 사용이 가능하다.
📌 UIAction.init(title:image:identifier:discoverabilityTitle:attributes:state:handler:)
Declaration
@MainActor convenience init(title: String = "",
                            image: UIImage? = nil,
                            identifier: UIAction.Identifier? = nil,
                            discoverabilityTitle: String? = nil,
                            attributes: UIMenuElement.Attributes = [],
                            state: UIMenuElement.State = .off,
                            handler: @escaping UIActionHandler)
잘 살펴보면 파라미터에 기본값이 설정이 되어있는 것을 알 수 있다. 그래서 원하는 파라미터에만 값을 넣어주어도 된다.
// handler 에 (UIAction) -> Void 형태의 클로저를 넣어주면 버튼의 액션이 등록된다!
UIButton.init(frame: .zero, primaryAction: UIAction(handler: { _ in
            print("click!")
        }))
Creating Buttons of a Specific Type
✨ init(type: UIButton.ButtonType)
Creates and returns a new button of the specified type.
- ButtonType 이라는 열거형은 다음과 같은 것들이 있다.
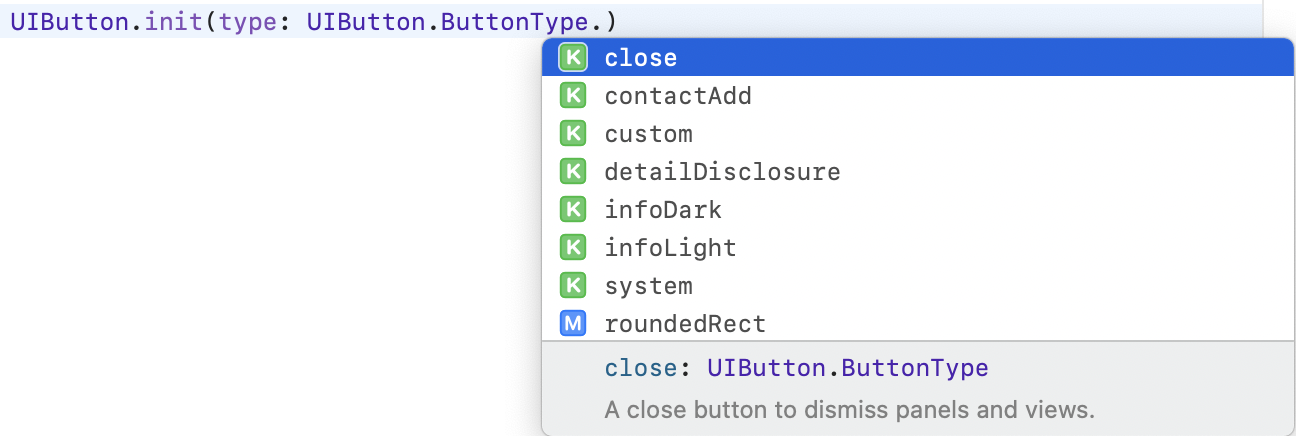
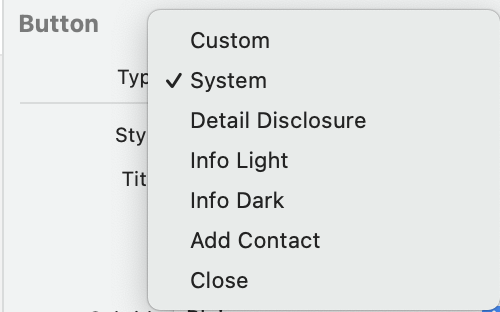
- 스토리보드에서도 Type 으로 설정가능한 프로퍼티들이다.
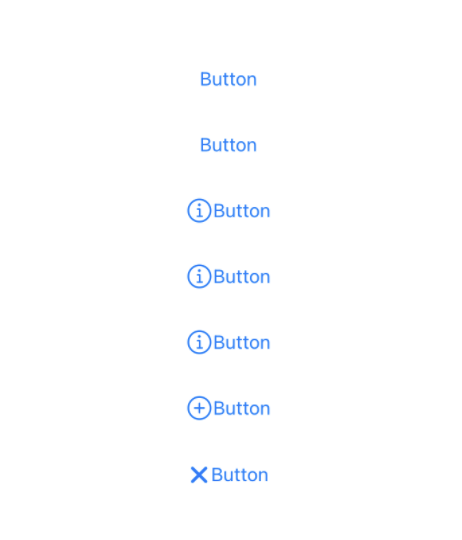
- 순서대로 버튼을 만들어 보았다. (InfoLight 와 InfoDark 의 차이는 밝고, 어두운 background 를 가진다는 것으로 설명된다. 예전에는 차이가 있었다고 하는데 현재는 동일하게 표시된다고 한다.)
✨ init(type: UIButton.ButtonType, primaryAction: UIAction?)
Creates a new button with the specified type, registers the primary action event, and sets the title and image to the action’s title and image.
Creating System Buttons
✨ class func systemButton(with: UIImage, target: Any?, action: Selector?) -> Self
Creates and returns a system type button with specified image, target, and action.
ButtonType.System 타입의 버튼 객체를 만드는 class 메서드이다.
⁉️ 잠깐! class func? static func?
class 키워드가 나온김에 class func 와 static func 에 대해서 가볍게 알아두고 넘어가보자!
둘다 타입메서드이다! 타입 메서드는 인스턴스를 만들지 않아도 호출할 수 있다. 차이점은 class 메서드는 override 가능하고 static 메서드는 override 할 수 없다.
자자.. 오래기다리셨습니다 드뎌 iOS 15부터 적용되는 Configuration 입니다
먼저 UIButton.Configuration 에 대해서 알아보고 생성자를 살펴보겠습니다.
Managing the Appearance with a Configuration Object
✨ var configuration: UIButton.Configuration?
The configuration for the button’s appearance.
Discussion
configuration 은 subtitle 라벨, background appearancee 에 대한 확장된 제어, 버튼 state 가 변경될 때 button configuration 을 변환하는 법을 포함한다.
UIButton 의 다른 속성과 메서드들과 함께 사용할 수 있다. configuration 이 nil 이면 setTitle(_:for:) 과 같은 UIButton 의 지원되는 속성과 메서드가 button 을 제어합니다.
(우선순위가 궁금해져서 다음과 같이 코드를 작성해봤어요!)
    @IBOutlet weak var testButton: UIButton!

    override func viewDidLoad() {
        super.viewDidLoad()

        testButton.setTitle("setTitle", for: .normal)
        testButton.setImage(UIImage(systemName: "circle.fill"), for: .normal)
// ✅ Configuration.
        var config = UIButton.Configuration.plain()
        config.title = "configuration"
        config.subtitle = "subtitle"
        config.image = UIImage(systemName: "circle")
        testButton.configuration = config
    }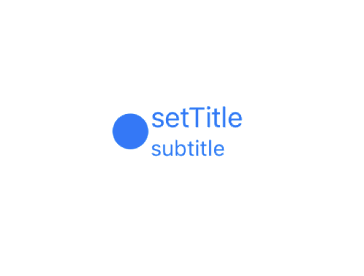
위와 같이 configuration 은 다른 메서드, 속성들과 함께 사용가능했어요!(subtitle 의 경우 적용됨.) 하지만 우선순위는 setTitle() 과 같은 기존의 메서드들이 높았어요.
Creating Buttons from a Configuration Object
✨ init(configuration: UIButton.Configuration, primaryAction: UIAction?)
Creates a new button with the specified configuration and registers the primary action event.
primary action 에 title 또는 image 가 포함된 경우에 이 메서드는 configuration 에 복사하고 버튼을 표시합니다.
타이틀이.... 복사가 된다고? 😯 함해봅시다!
@IBOutlet weak var testButton: UIButton!

    override func viewDidLoad() {
        super.viewDidLoad()

        var config = UIButton.Configuration.plain()
        config.title = "configuration"

        let testButton = UIButton(configuration: config, primaryAction: UIAction(title: "primaryAction", handler: { _ in return }))
        testButton.frame = CGRect(x: 100, y: 100, width: 200, height: 30)
        view.addSubview(testButton)

        print(testButton.configuration?.title)
    }

// Optional("primaryAction")
분명 UIButton 의 configuration 에 config 를 넣어주었는데..! UIAction 으로 설정한 "primaryAction" 라는 타이틀이.. 복사가 되었다. 당연히 버튼의 타이틀도 "primaryAction" 이다.
이것저것 코드를 쳐본 결과 Configuration 의 우선순위가 낮아보입니다!
그러면 configuration 으로 어떤 속성들을 다룰 수 있는지 코드와 indicator 두가지 모두 알아보자구요!
😎 Creating Configurations
UIButton.Configuration 에는 이니셜라이저가 없기 때문에 초기화할수가 없어요! 대신 4 가지 static 메서드를 제공합니다!
- static func plain() -> UIButton.Configuration : Creates a configuration for a button with a transparent background.
- static func filled() -> UIButton.Configuration : Creates a configuration for a button with a background filled with the button’s tint color.
- static func gray() -> UIButton.Configuration : Creates a configuration for a button with a gray background.
- static func tinted() -> UIButton.Configuration : Creates a configuration for a button with a tinted background color.
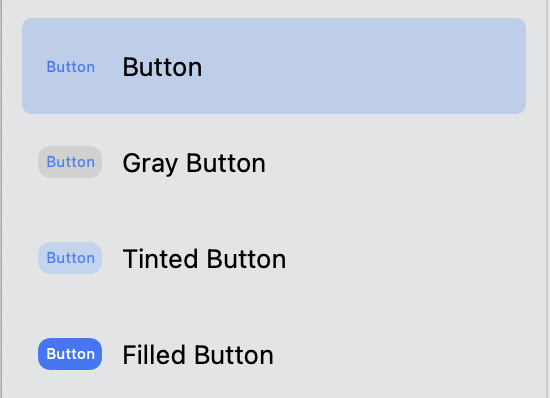
(위에서부터 plain,gray,tinted, filled 순서이다.)
😎 Title / Subtitle / Image
Configuration 을 객체로 만들어두니까 공통적인 버튼에 대해서 동일하게 속성을 적용하는 이점이 있었다.
    @IBOutlet weak var button1: UIButton!
    @IBOutlet weak var button2: UIButton!
    @IBOutlet weak var button3: UIButton!


    override func viewDidLoad() {
        super.viewDidLoad()

        // Configuration
        var config = UIButton.Configuration.filled()
        config.title = "Title"
        config.subtitle = "Subtitle"
        config.image = UIImage(systemName: "swift")

        button1.configuration = config
        button2.configuration = config
        button3.configuration = config
    }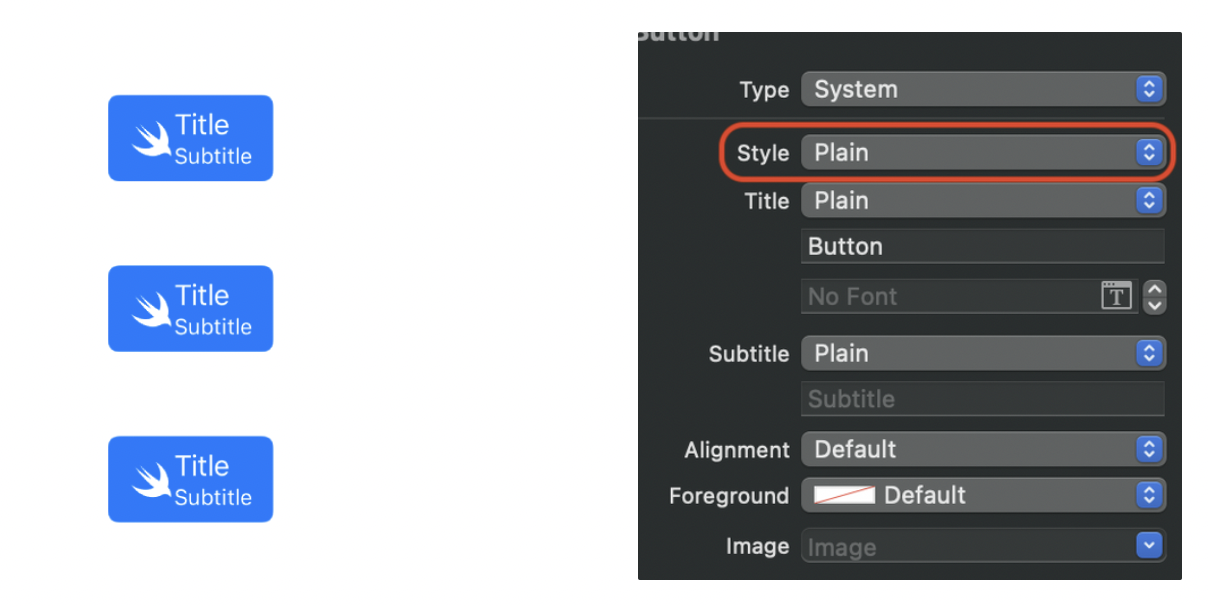
🔍 UIButton.Configuration.filled() 로 filled 버튼을 위한 Configuration 을 만들 수 있고 우측의 inspector 로 Type 을 설정할 수 있다.
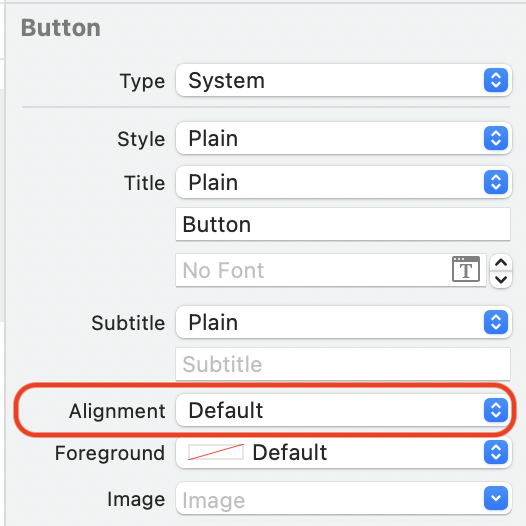
😎 TitleAlignment
- titleAlignment : title 과 subtitle 을 배치하는데 사용하는 정렬.
var config = UIButton.Configuration.filled()
config.title = "Title"
config.subtitle = "Subtitle"
config.image = UIImage(systemName: "swift")

config.titleAlignment = .leading
button1.configuration = config

config.titleAlignment = .center
button2.configuration = config

config.titleAlignment = .trailing
button3.configuration = config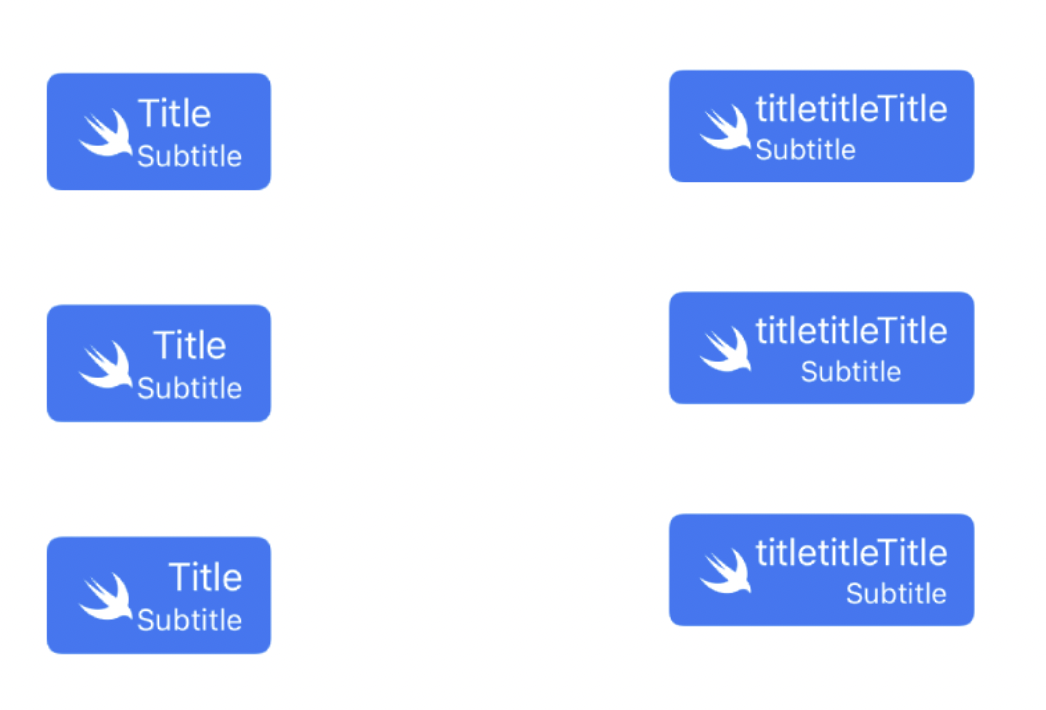
titleAlignment 속성은 title 과 subtitle 을 배치하는 정렬이다. 좀 더 긴쪽을 기준으로 정렬된다. 우측의 경우 title 을 길게 했더니 title 기준으로 정렬되었다.
🔍 inspector 에서 다음으로 설정가능.
😎 ContentInsets / Padding
- titlePadding : title 과 subtitle 라벨 사이의 거리
- imagePadding : 버튼의 image 와 text 사이의 거리
- contentInsets : 버튼의 content area 부터 bounds 까지의 거리
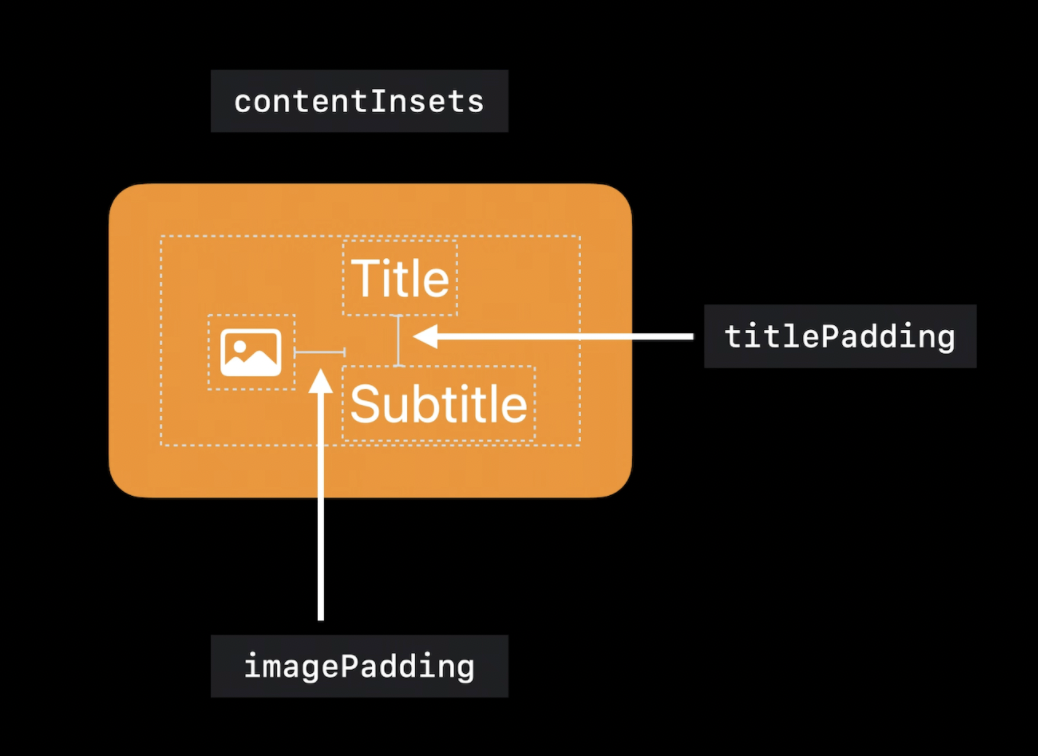
- 출처 :
A new way to style UIButton with UIButton.Configuration in iOS 15 | Sarunw
Deprecated 되는 imageEdgeInsets 와 titleEdgeInsets 를 대체한다.
config.titlePadding = 10
config.imagePadding = 10
config.contentInsets = NSDirectionalEdgeInsets.init(top: 10, leading: 10, bottom: 10, trailing: 10)
button1.configuration = config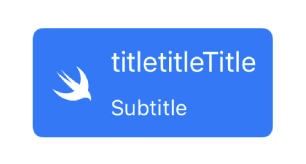
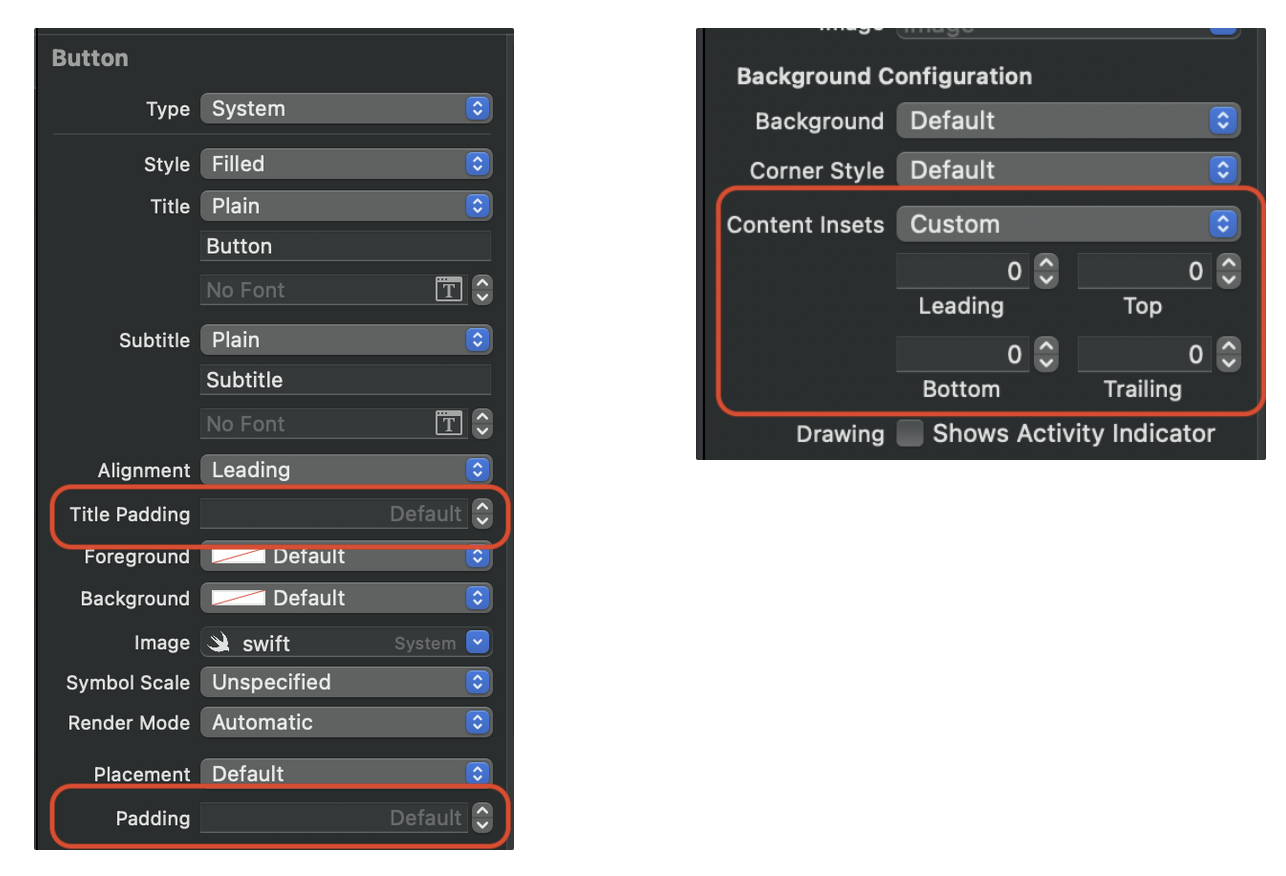
🔍 좌측의 indicator 에서 Padding, 우측의 indicator 에서 Content Insets 설정 가능.
😎 Image Placement
- imagePlacement : 버튼이 이미지를 위치시키는 edge.
config.imagePlacement = NSDirectionalRectEdge.leading
button1.configuration = config

config.imagePlacement = NSDirectionalRectEdge.top
button2.configuration = config

config.imagePlacement = NSDirectionalRectEdge.trailing
button3.configuration = config

config.imagePlacement = NSDirectionalRectEdge.bottom
button4.configuration = config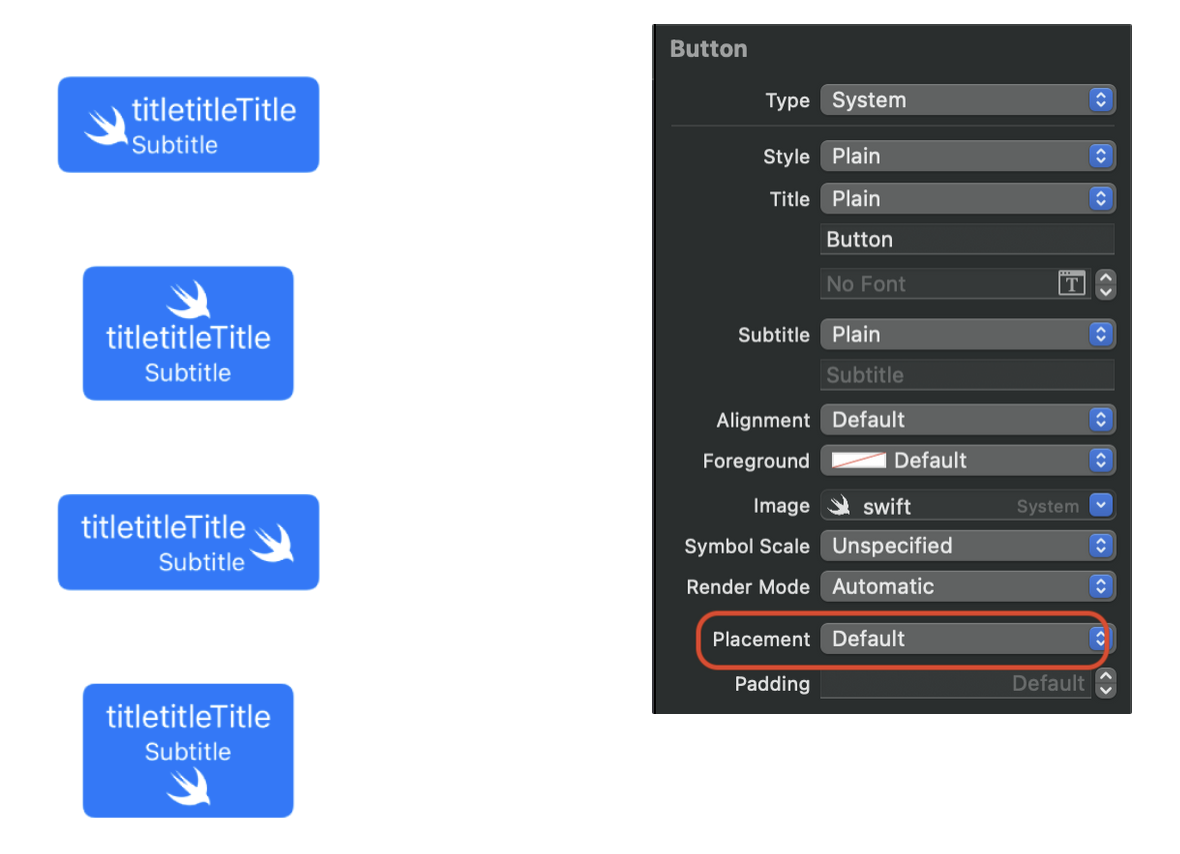
🔍 inspector 에서 다음으로 설정가능.
❗️ imagePlacement 의 프로퍼티 값에 따라서 title과 subtitle 이 정렬된다.
😎 Button Color
baseBackgroundColor : background 색을 위한 untransformed color.
baseForegroundColor : foreground 색을 위한 untransformed color.
background 는 UIBackgroundConfiguration 의 자료형을 가진다.

Background Configuration은 views 를 위한 backgrounds 를 만드는 간단한 방법을 제공한다.Background Configuration을 직접UIButton,UICollectionView와UITableView의 cells, headers, footers 에 적용할 수도 있다.
- background.backgroundColor : background 색.
- background.strokeColor : 테두리 색.
- background.strokeWidth : 테두리 너비.
config.baseBackgroundColor = UIColor.orange
config.baseForegroundColor = UIColor.black
button1.configuration = config

config.background.strokeColor = UIColor.red
config.background.strokeWidth = 3
config.background.backgroundColor = UIColor.yellow
button2.configuration = config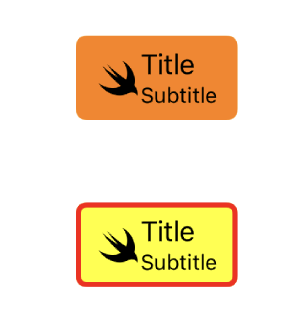
🔍 좌측의 indicator 는 버튼의 색, 우측의 indicator 는 모서리의 색과 너비를 설정 가능.
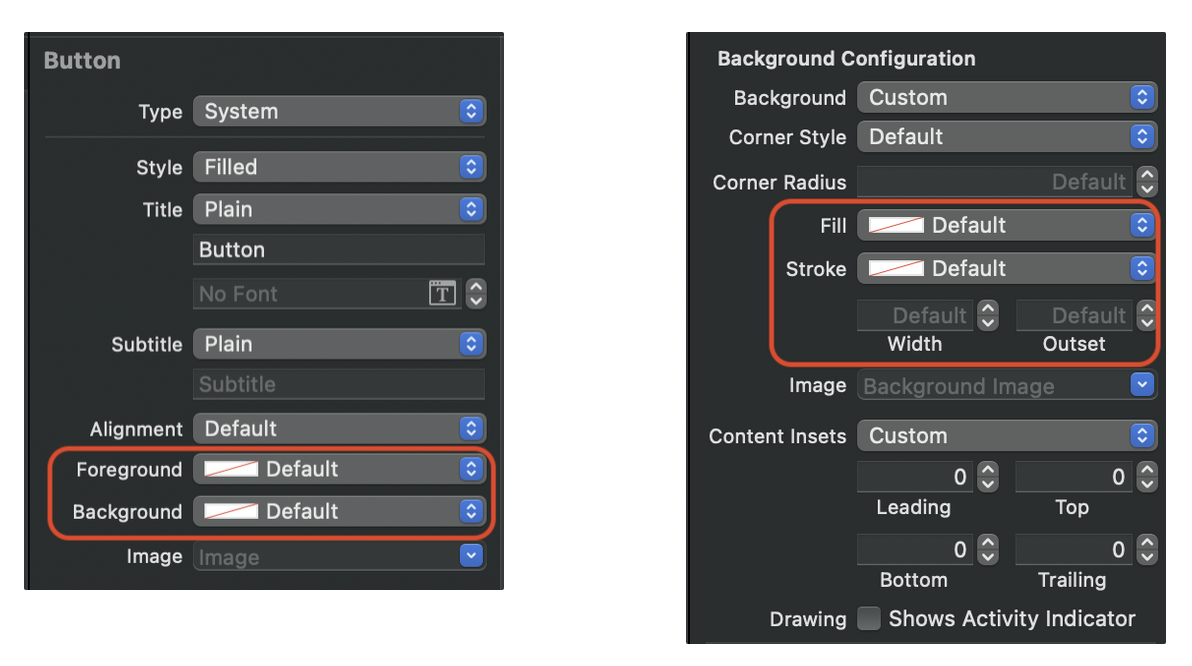
😎 Activity Indicator
- showsActivityIndicator : 버튼에 이미지 대신 activity indicator 가 표시되는지 여부.
config.showsActivityIndicator = true
button1.configuration = config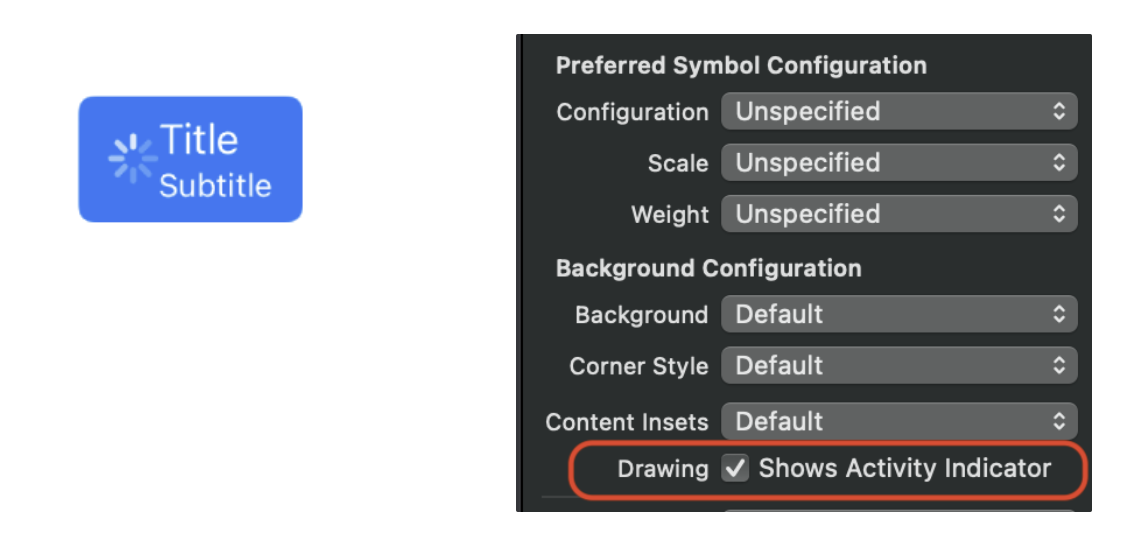
🔍 indicator 에서 체크박스를 설정하면 Acitivity Indicator 를 표시할 수 있다.
😎 Button Size
- buttonSize : 버튼의 기본 크기를 요청.
config.buttonSize = .large
button1.configuration = config

config.buttonSize = .medium
button2.configuration = config

config.buttonSize = .small
button3.configuration = config

config.buttonSize = .mini
button4.configuration = config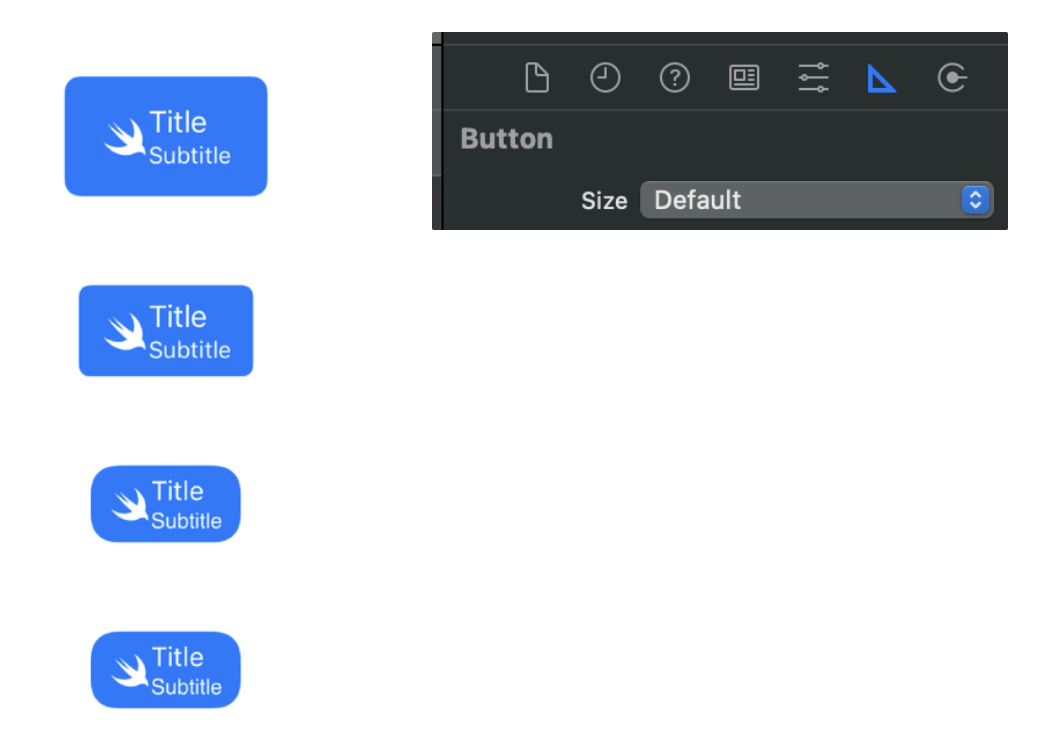
🔍 Attributes Inspector 말고 Size Inspector 에서 버튼의 Size 를 설정할 수 있다.
😎 Round Corner
- background.cornerRadius : background 와 stroke 에 대한 기본 모서리 반경.
- cornerStyle : background 모서리 반경을 제어. 기본값은 dynamic.
config.background.cornerRadius = 5
button1.configuration = config

// ✅ 수정없이 background corner radius 를 사용.
config.cornerStyle = .fixed
button2.configuration = config

// ✅ dynamic type 으로 background corner radius 를 조정.
config.cornerStyle = .dynamic
button3.configuration = config

// ✅ background corner radius 를 무시하고 capsule 을 생성하는 corner radius 사용.
config.cornerStyle = .capsule
button4.configuration = config

// ✅ 아래 속성들은 background corner radius 를 무시하고 system-defined corner radius 적용.
config.cornerStyle = .large
button5.configuration = config

config.cornerStyle = .medium
button6.configuration = config

config.cornerStyle = .small
button7.configuration = config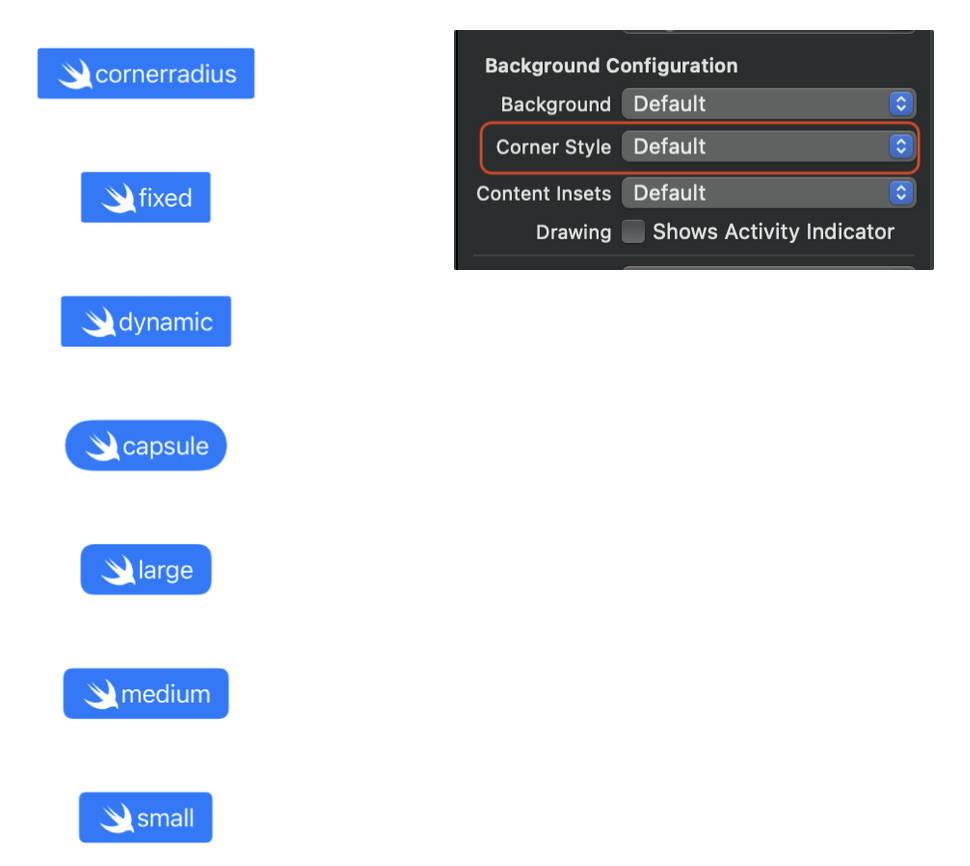
🔍 inspector 에서 다음으로 설정가능.
⁉️ 잠깐 잠깐.. Dynamic type..?
이번 iOS 15 에서 UIButton 의 바뀐점은 크게 세가지에요
- Plain, Gray, Tinted, Filled 스타일의 버튼 추가
- multiline text(subtitle) 지원
- Dynamic Type 기본적으로 지원
🥲 에.. Dynamic Type 지원.. 이란..
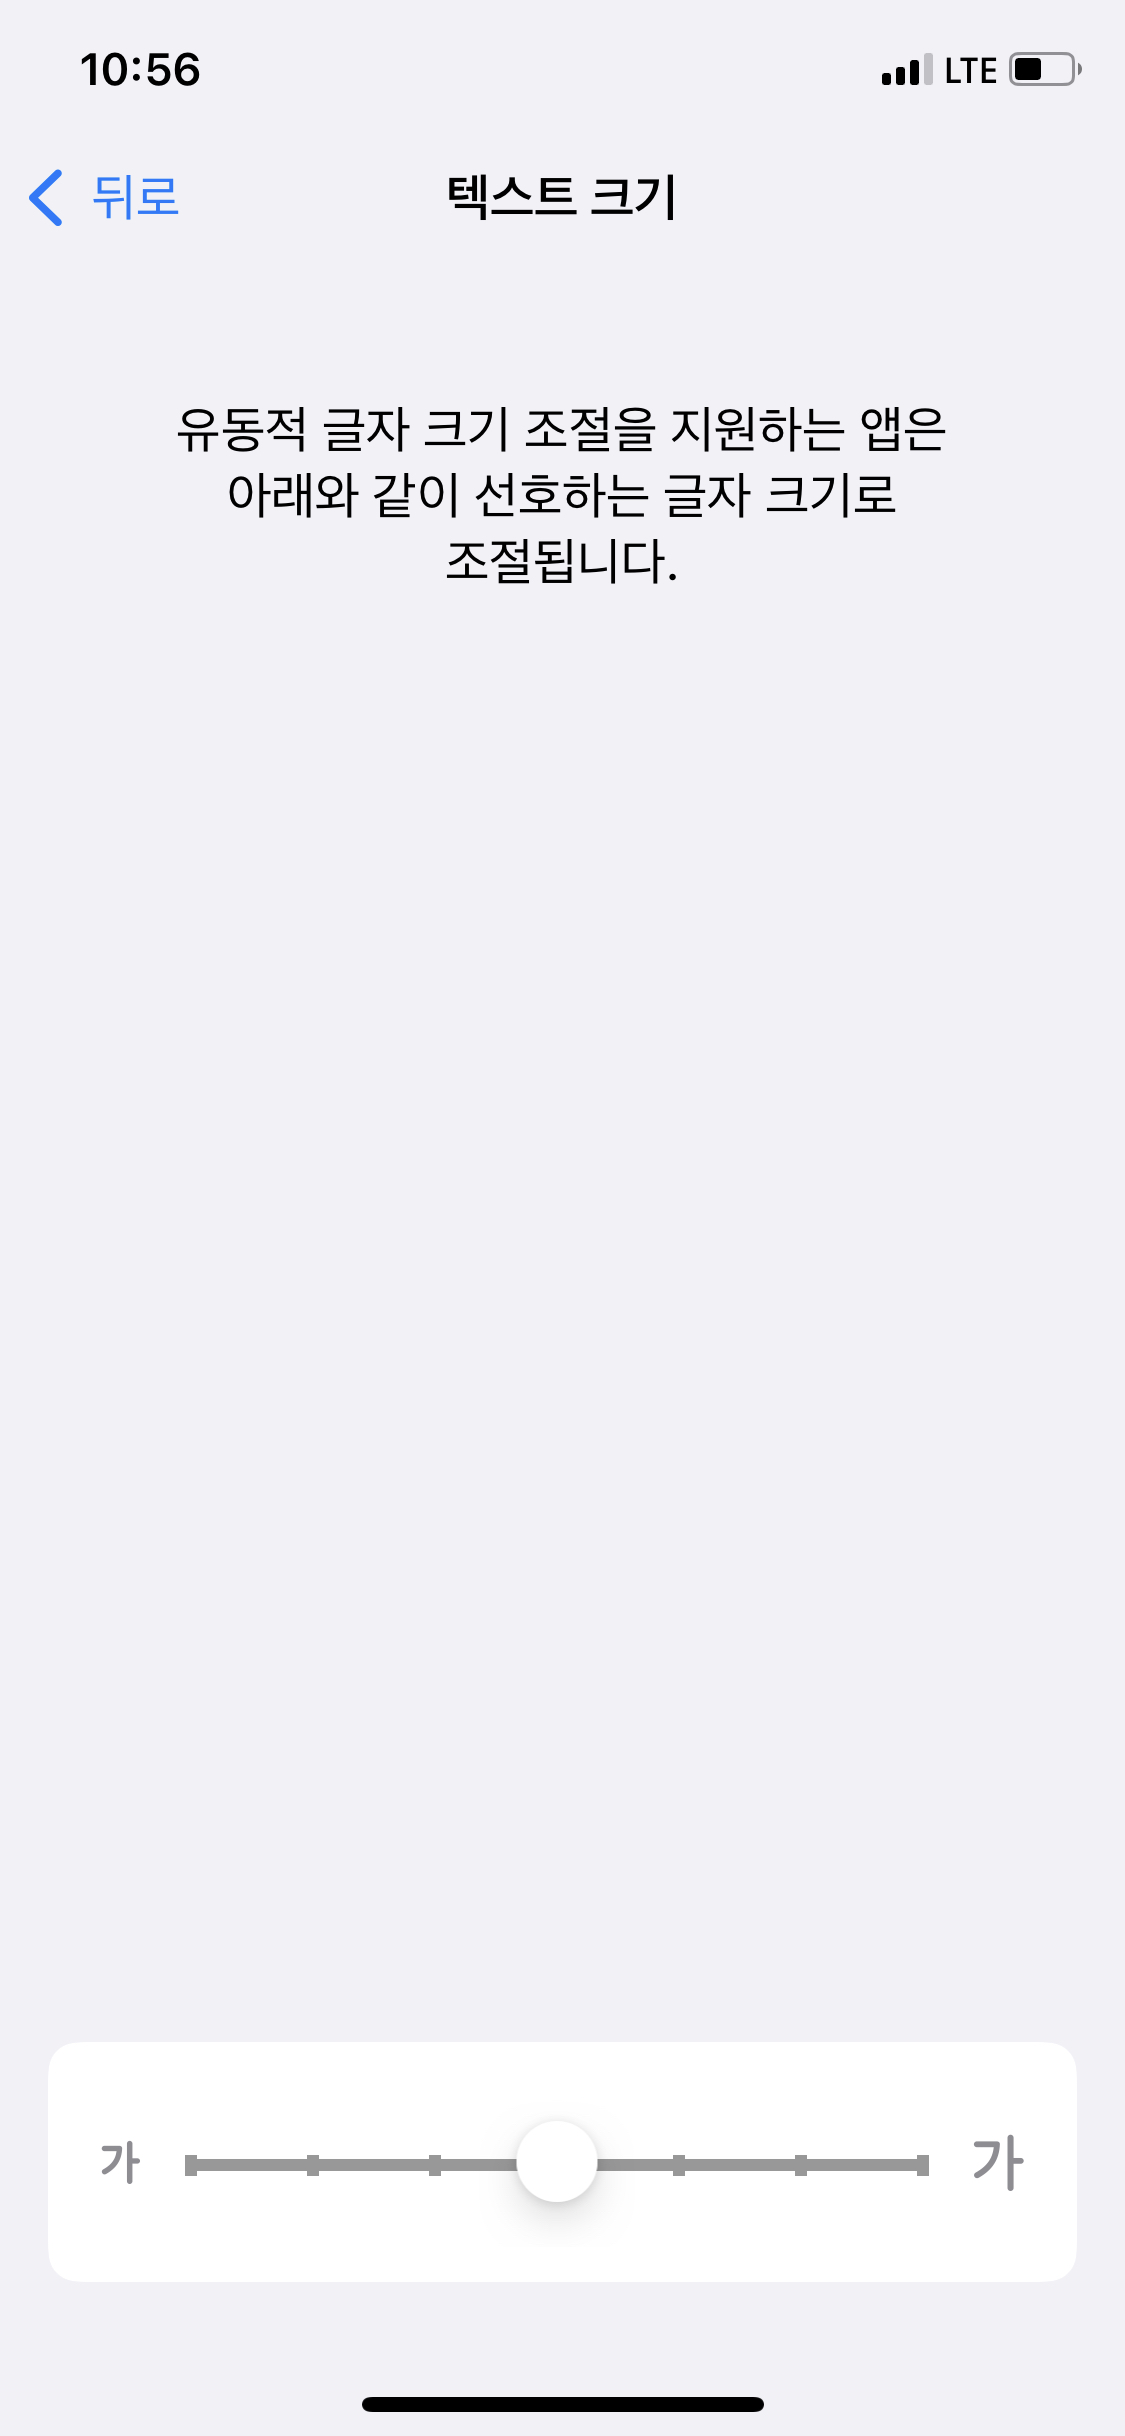
위와 같이 텍스트 크기를 설정할 수 있는데 이때 UIButton 도 적용이 된다는 것이고,
그래서 UIButton.Configuration.CornerStyle.dynamic 은 Dynamic Tpye 에 따라서 모서리를 조정하는 옵션입니다!
출처 :
😎 Configuration update Handler
- UIButton.ConfigurationUpdateHandler : 버튼의 configuration 을 업데이트하는 클로저((UIButton) - > Void)
이것을 활용해서 button 의 state 에 따라서 button 의 title 을 업데이트 할 수 있어요!
let config = UIButton.Configuration.filled()

let handler: UIButton.ConfigurationUpdateHandler = { button in
        switch button.state {
        case [.selected, .highlighted]:
            button.configuration?.title = "Highlighted Selected"
        case .selected:
            button.configuration?.title = "Selected"
        case .highlighted:
            button.configuration?.title = "Highlighted"
        case .disabled:
            button.configuration?.title = "Disabled"
        default:
            button.configuration?.title = "Normal"
        }
}

// ✅ configuration 에 config 를 설정해주지 않으면 버튼의 configuration 이 nil 이 되는데 이때 런타임 오류가 발생한다.
button1.configuration = config
button1.configurationUpdateHandler = handler

button2.configuration = config
button2.isSelected = true
button2.configurationUpdateHandler = handler

button3.configuration = config
button3.isEnabled = false
button3.configurationUpdateHandler = handler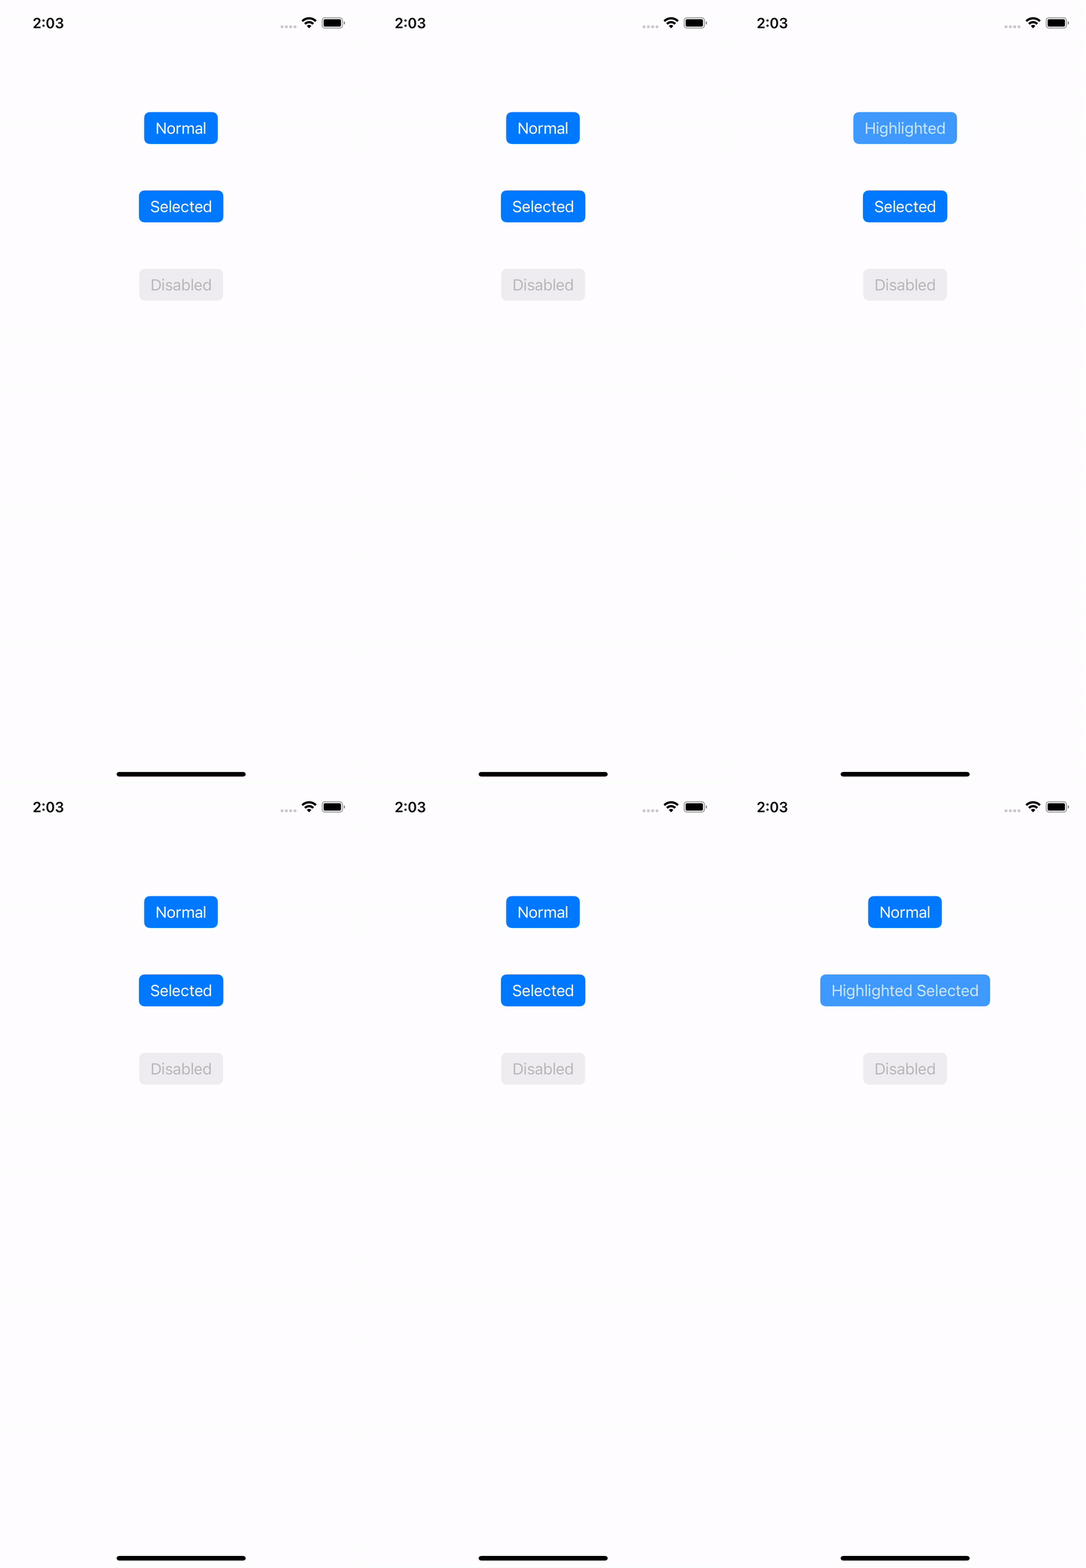
ConfigurationUpdateHandler 를 활용해서 setTitle(_:for:) 도 대체될 수 있어요!
button1.setTitle("Normal", for: .normal)
button1.setTitle("Highlighted", for: .highlighted)

// ✅ 대체 가능
button1.configurationUpdateHandler = { button in
    switch button.state {
    case .highlighted:
        button.configuration?.title = "Highlighted"
    default:
        button.configuration?.title = "Normal"
    }
}
❗️ 앞서 Configuration 은 setTitle(_:for:) 와 같은 set 메서드들 보다 우선순위가 낮다고 소개했는데요. ConfigurationUpdateHanlder 도 낮을지 확인해볼까요?
let config = UIButton.Configuration.filled()

let handler: UIButton.ConfigurationUpdateHandler = { button in
        switch button.state {
        case .normal:
            button.configuration?.title = "Configuration"
        default:
            button.configuration?.title = "Configuration"
        }
}
button1.configurationUpdateHandler = handler
button1.setTitle("setTitle", for: .normal)
button1.configuration = config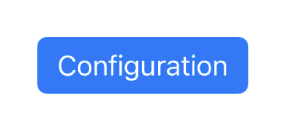
ConfigurationUpdateHanlder 가 우선순위가 높네요!
😎 Comparing Configurations
Configurations 도 비교 연산이 가능합니다!
- static func == (UIButton.Configuration, UIButton.Configuration) -> Bool : Indicates whether two button configurations are equal.
- static func != (UIButton.Configuration, UIButton.Configuration) -> Bool : Indicates whether two button configurations aren’t equal.
// ✅ 다음과 같이 연산자를 사용가능하다.
if button1.configuration == button2.configuration {
            print("button1.configuration == button2.configuration")
}
출처 :
Button Configuration in iOS 15
A new way to style UIButton with UIButton.Configuration in iOS 15 | Sarunw
'iOS' 카테고리의 다른 글
| iOS) Xib 로 만든 커스텀뷰에서 액션 연결 (0) | 2021.11.06 |
|---|---|
| iOS) Dynamic Type (2) | 2021.11.05 |
| iOS) 커스텀 뷰 Xib 연결하기 (0) | 2021.11.02 |
| iOS) UICollectionViewCell 내용에 대해 동적인 사이즈 적용시키기 (6) | 2021.10.28 |
| iOS) 여러개의 view controller pop 하기 (2) | 2021.10.20 |
- 2022 KAKAO TECH INTERNSHIP
- RxCocoa
- Objective-C
- Notification
- CloneCoding
- configurable widget
- Protocol
- WWDC22
- WWDC
- MOYA
- Widget
- github
- SwiftUI
- APNS
- containerBackground
- projectsetting
- YPImagePicker
- Algorithm
- rxswift
- WidgetKit
- 서버통신
- Firebase
- IOS
- MVVM
- OpenSourceLibrary
- async/await
- Swift
- watchOS
- urlsession
- UserDefaults
| 일 | 월 | 화 | 수 | 목 | 금 | 토 |
|---|---|---|---|---|---|---|
| 1 | 2 | 3 | 4 | |||
| 5 | 6 | 7 | 8 | 9 | 10 | 11 |
| 12 | 13 | 14 | 15 | 16 | 17 | 18 |
| 19 | 20 | 21 | 22 | 23 | 24 | 25 |
| 26 | 27 | 28 | 29 | 30 | 31 |
- Total
- Today
- Yesterday
