티스토리 뷰
내용
- RoundCode 오픈소스 라이브러리를 사용해서 QR code 와 reader 를 만들어보자.
https://github.com/aslanyanhaik/RoundCode
Installation
Cocoapods:
pod 'RoundCode'Swift Package Manager:
File > Swift Packages > Add Package Dependency
https://github.com/aslanyanhaik/RoundCodeUsage example
import framwork
import RoundCodeEncoding
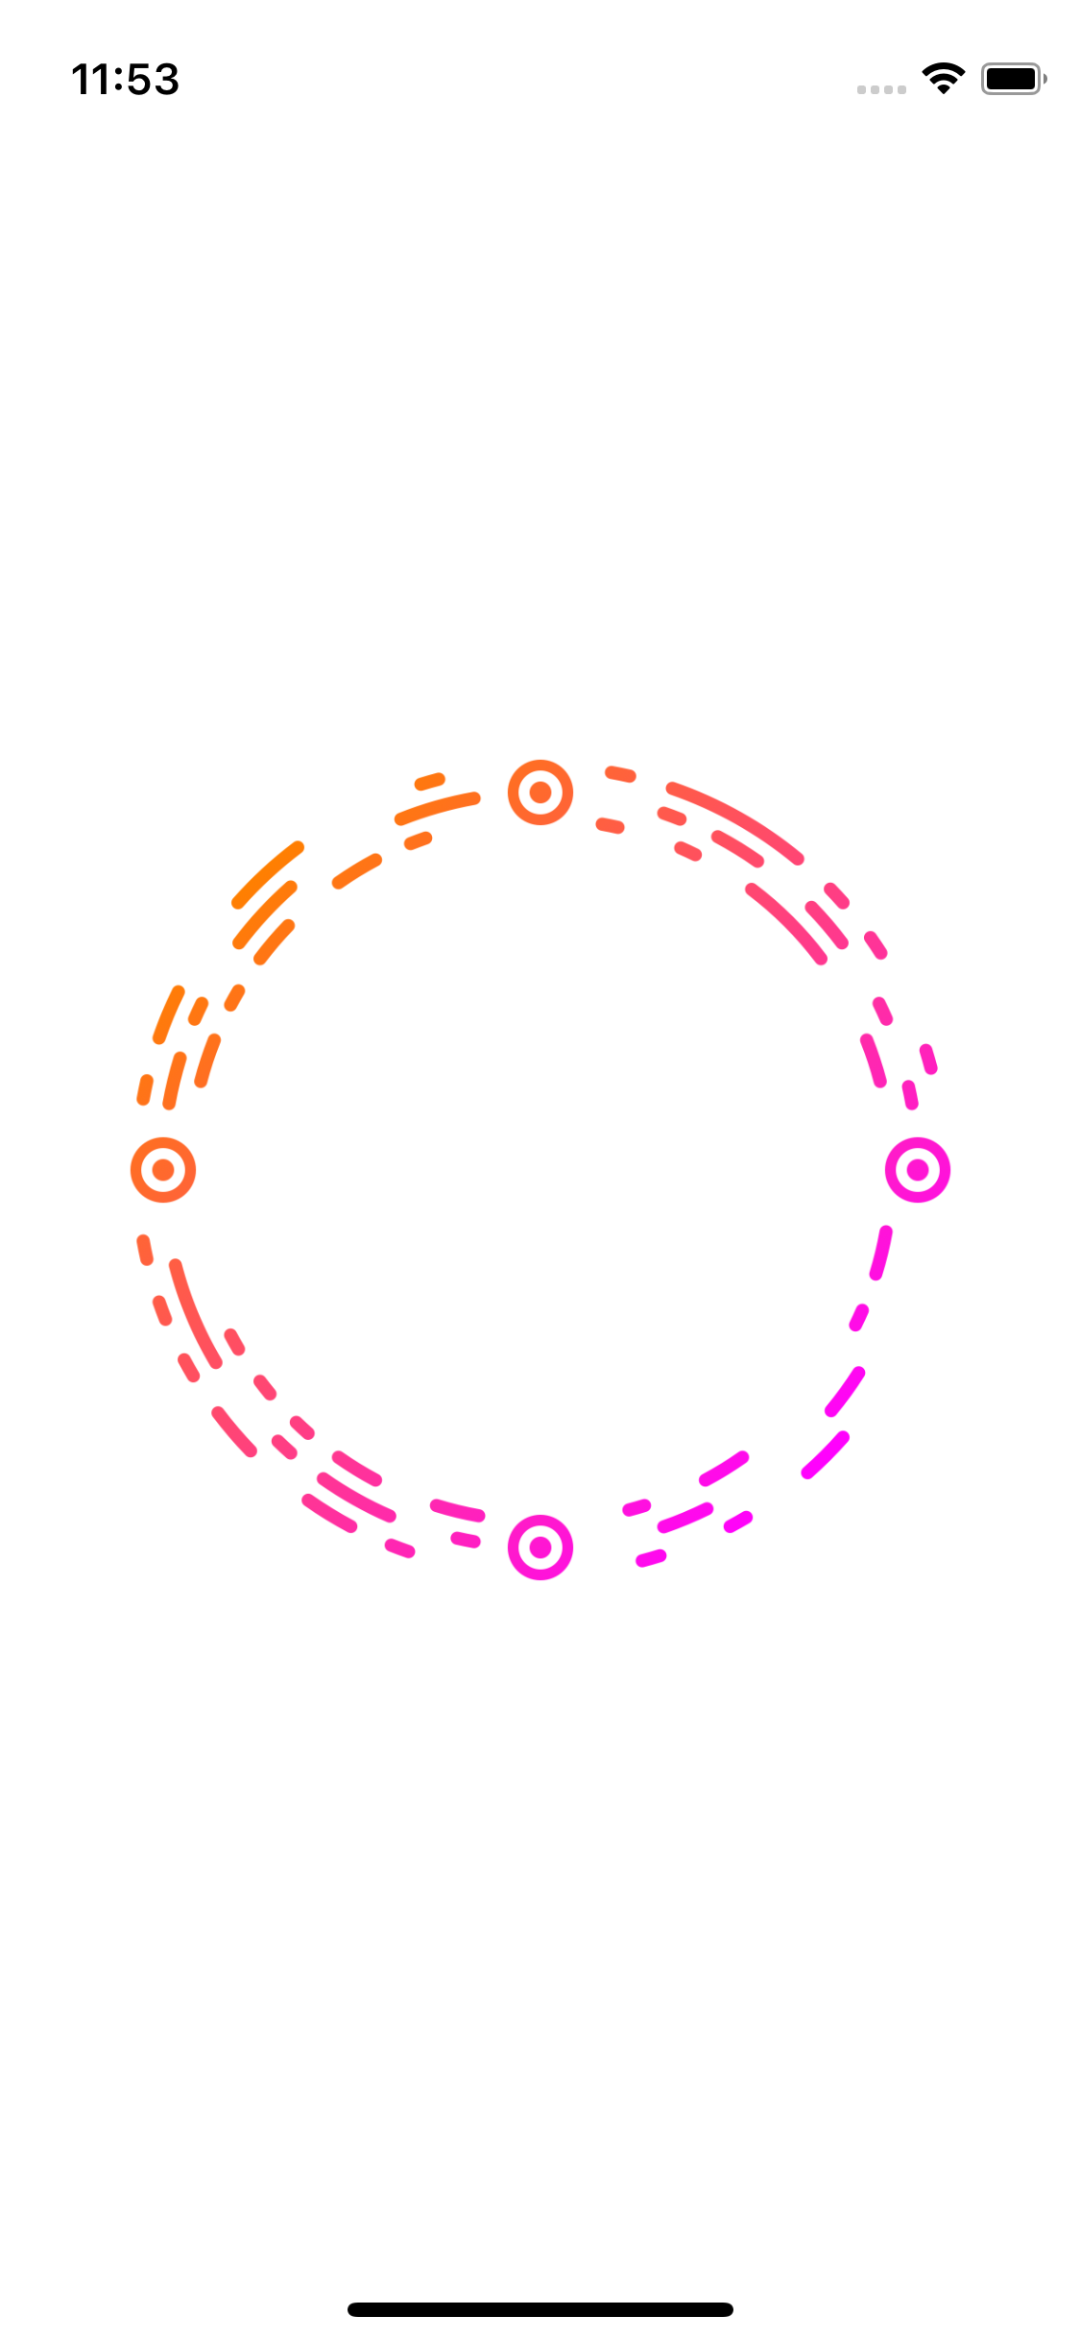
coder 를 만들고 encode 해봅시다.(해당 라이브러리에서는 encode(_:) 가 QR code 로 인코딩하는 메서드입니다.)
let image = RCImage(message: "Hello World")
let coder = RCCoder()
do {
  imageView.image = try coder.encode(image)
} catch {
  // handle errors
}

// 🧌
// public final class RCCoder {
//   public init(configuration: RCCoderConfiguration = .defaultConfiguration) {
//     self.configuration = configuration
//   }
// }
Validate before encoding
해당 문자열이 coder 의 configuration 에 유효한지 인코딩 전에 검사할 수 있습니다.
let coder = RCCoder()
let isValidText = coder.validate("Hello world")

// 🧌
// func validate(_ text: String) -> Bool {
//    configuration.validate(text)
// }
Decoding
RCCameraViewController 인스턴스화 및 delegate 다루기
Create instane of RCCameraViewController and handle the delegate
class ViewController: UIViewController, RCCameraViewControllerDelegate {

  func scan() {
    let cameraController = RCCameraViewController()
    cameraController.delegate = self
    present(cameraController, animated: true)
  }

  func cameraViewController(didFinishScanning message: String) {
    messageLabel.text = message
  }
}
UIImage 도 아래와 같이 decode 가 가능합니다.
let coder = RCCoder()
do {
  messageLabel.text = try coder.decode(UIImage(named: code)!)
} catch {
  //handle errors
}
Appearance
모습을 아래와 같이 변경할 수 있습니다.
var image = RCImage(message: "Hello world")
image.contentInsets = UIEdgeInsets(top: 8, left: 10, bottom: 4, right: 10)
image.attachmentImage = UIImage(named: "Profile")
image.size = 300
image.gradientType = .linear(angle: CGFloat.pi)
image.tintColors = [.red, .black]

// 🧌 RCImage 의 구조체에 대해서 살펴보자. 기본적으로 제공하는 값들이 있다.
// import UIKit

// public struct RCImage {

//   public var message: String
//   public var size = CGFloat(300)
//   public var tintColors: [UIColor] = [.orange, .magenta]
//   public var attachmentImage: UIImage?
//   public var isTransparent = false
//   public var gradientType = GradientType.linear(angle: CGFloat.pi / 4)
//   public var contentInsets = UIEdgeInsets(top: 8, left: 8, bottom: 8, right: 8)

//   public init(message: String) {
//     self.message = message
//   }
// }

// public extension RCImage {
//   enum GradientType {
//     case linear(angle: CGFloat)
//     case radial
//   }
// }
이미지가 어두운 배경에 있으면 scanning mode 를 .darkBackground 로 설정하면 됩니다.
let coder = RCCoder()
coder.scanningMode = .darkBackgroundAdvanced coding configuration
글자의 수를 줄여서 긴 텍스트를 인코딩하기 위해 custom configuration 을 제공할 수 있습니다. (현재 기본 .defaultConfiguration 에서는 긴 글자는 Error 를 던집니다.)
let configuration = RCCoderConfiguration.shortConfiguration
let coder = RCCoder(configuration: configuration)

// 🧌 Configuration 으로 설정된 정의. message 가 해당 characters 파라미터에 속해야 정상적으로 인코딩을 해준다.
// public static let uuidConfiguration = RCCoderConfiguration(characters: "-ABCDEF0123456789")

// public static let numericConfiguration = RCCoderConfiguration(characters: ".,_0123456789")

// public static let shortConfiguration = RCCoderConfiguration(characters: " -abcdefghijklmnopqrstuvwxyz0123456789")

// public static let defaultConfiguration = RCCoderConfiguration(characters: ##"! "#$%&'()*+,-./0123456789:;<=>?@ABCDEFGHIJKLMNOPQRSTUVWXYZ[\]^_`abcdefghijklmnopqrstuvwxyz{|}~"##)
let configuration = RCCoderConfiguration(characters: " -abcdefghijklmnopqrstuvwxyz0123456789")
let coder = RCCoder(configuration: configuration)⚠️ custom configuration 으로 인코딩하는 경우, RCCameraViewController configuration 도 변경을 해야합니다. ⚠️
let configuration = RCCoderConfiguration(characters: " -abcdefghijklmnopqrstuvwxyz0123456789")
let coder = RCCoder(configuration: configuration)
let camera = RCCameraViewController()
camera.coder = coder구현해보자!
내용
- code 의 모습도 변경해보자!
- reader 만들어보자!
- configuration 을 변경해서 사용해보자.
- Error Handling 해보자!
Create Code and Encode
- 앞으로 실습해볼 개발 환경을 구축해보겠습니다.
import UIKit

import RoundCode
import Then

class ViewController: UIViewController {

    // MARK: - Properties

    private let imageView = UIImageView().then {
        $0.translatesAutoresizingMaskIntoConstraints = false
    }

    // MARK: - View Life Cycle

    override func viewDidLoad() {
        super.viewDidLoad()

        setCode()
        setLayout()
    }
}

// MARK: - Extensions

extension ViewController {
    private func setCode() {
        // 🔥
        var image = RCImage(message: "Hello, i am hyungyu")
        let coder = RCCoder()

        // MARK: - custom configuration

        // MARK: - Appearance

        // MARK: - Error Handling

        do {
            imageView.image = try coder.encode(image)
        } catch {
            // handle errors
        }
    }
}

// MARK: - Layout

extension ViewController {
    private func setLayout() {
        self.view.addSubview(imageView)

        NSLayoutConstraint.activate([
            imageView.centerXAnchor.constraint(equalTo: self.view.centerXAnchor),
            imageView.centerYAnchor.constraint(equalTo: self.view.centerYAnchor),
            imageView.widthAnchor.constraint(equalToConstant: 300),
            imageView.heightAnchor.constraint(equalToConstant: 300)
        ])
    }
}- 다음은 기본적인 설정이다.

Set Appearance
// MARK: - Appearance

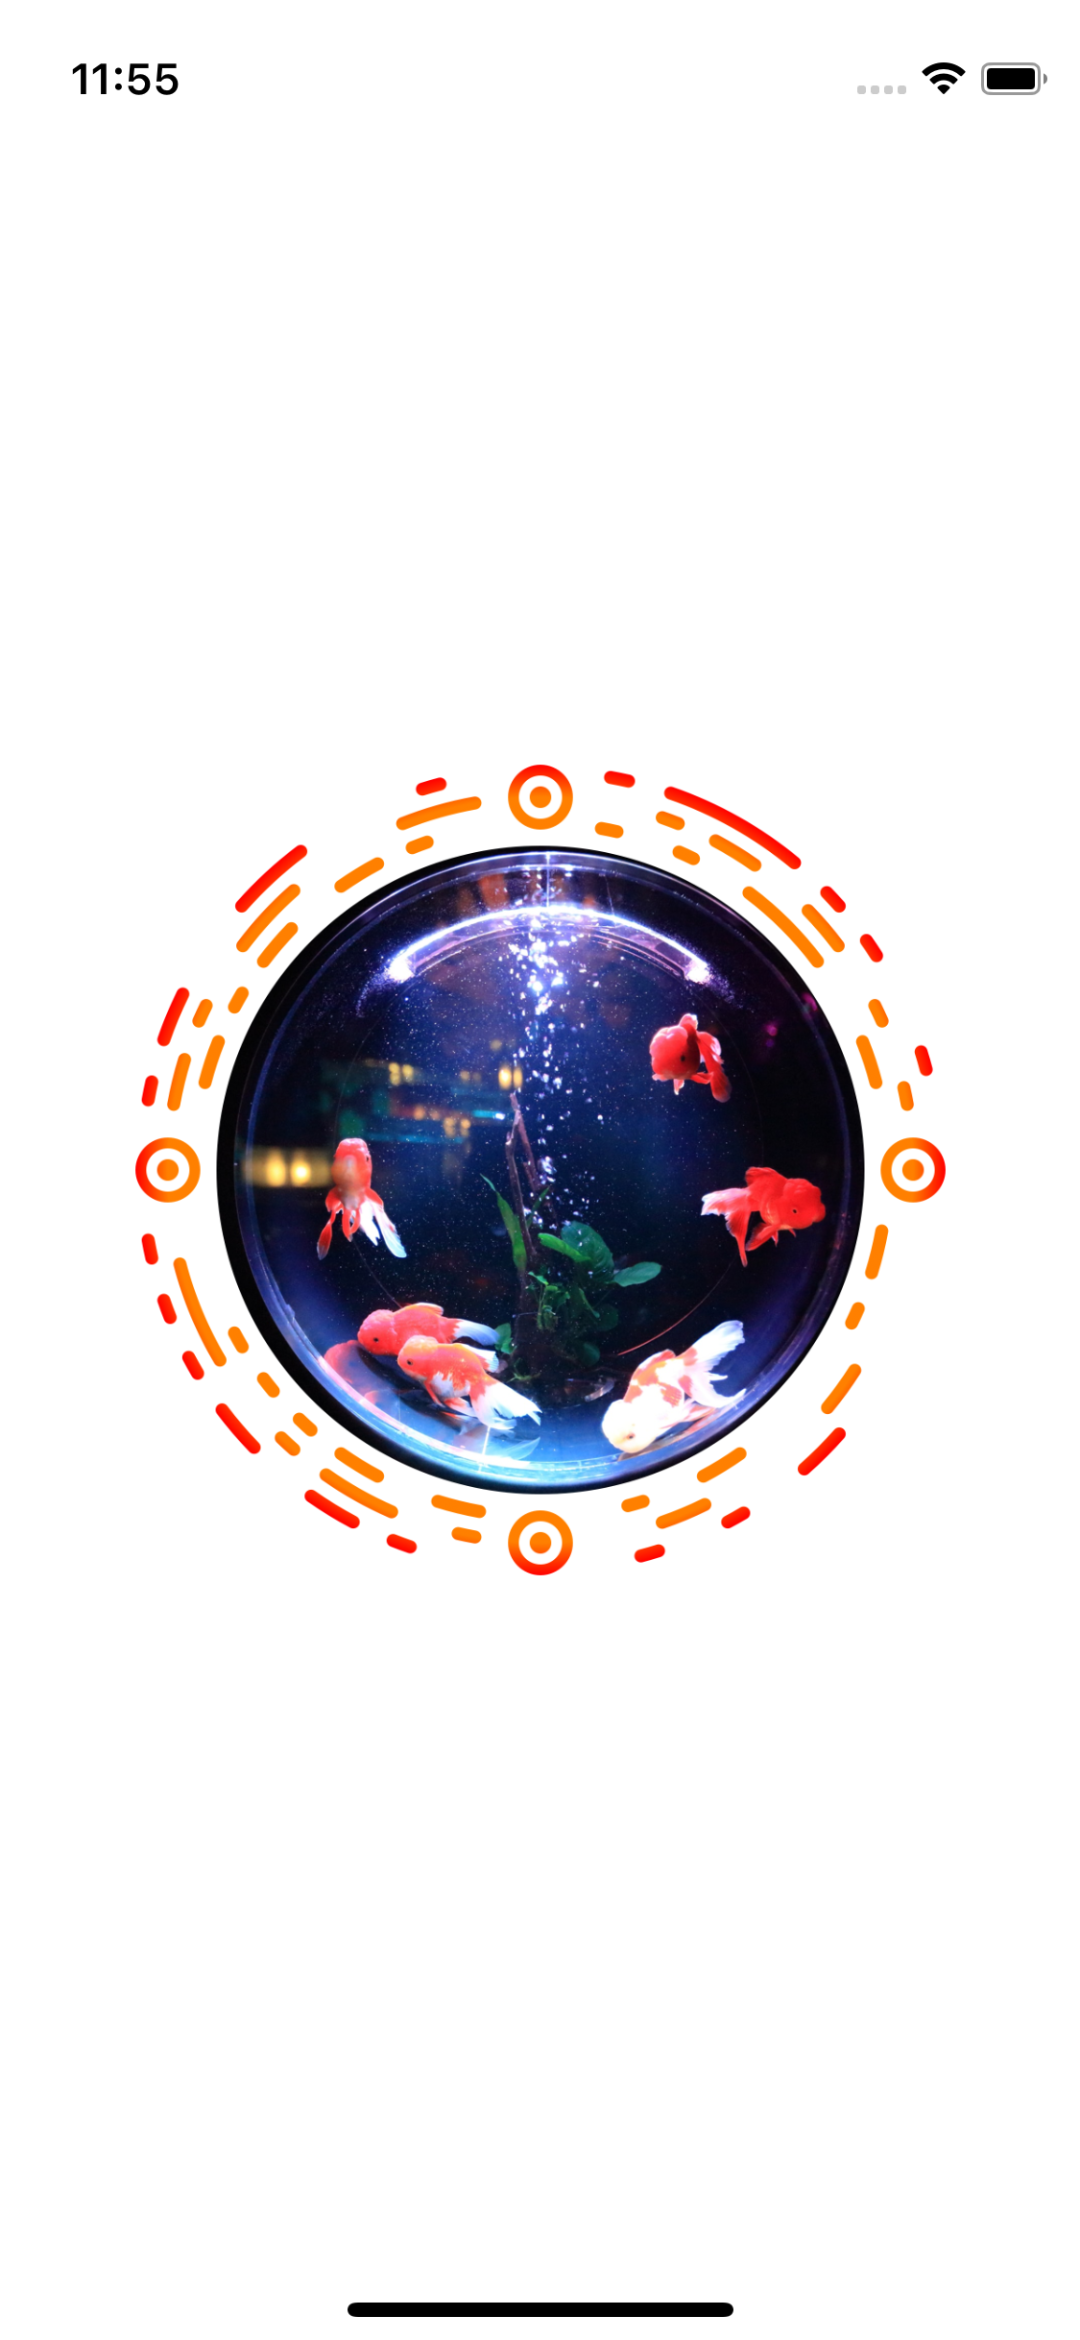
        image.contentInsets = UIEdgeInsets(top: 10, left: 10, bottom: 10, right: 10)
        image.attachmentImage = UIImage(named: "fishbowl")
        image.size = 300
        image.tintColors = [.orange, .red]
        image.gradientType = .radial
Creat Reader and Decoding
import UIKit

import RoundCode
import Then

class ViewController: UIViewController {

    // MARK: - Properties

    // ...

    private let cameraButton = UIButton().then {
        $0.translatesAutoresizingMaskIntoConstraints = false

        $0.setTitle("Scan", for: .normal)

        let config = UIButton.Configuration.filled()
        $0.configuration = config
    }

    private let messageLabel = UILabel().then {
        $0.translatesAutoresizingMaskIntoConstraints = false

        $0.text = "Scan the Code!"
    }

    // MARK: - View Life Cycle

    override func viewDidLoad() {
        super.viewDidLoad()

        setCode()
        setLayout()
        setAddTargets()
    }
}

// MARK: - Extensions

extension ViewController {
    // ...

    private func setAddTargets() {
        cameraButton.addTarget(self, action: #selector(touchCameraButton), for: .touchUpInside)
    }

    // MARK: - @Objc Methods

    @objc
    private func touchCameraButton() {
        self.scan()
    }
}

// MARK: - RCCameraViewControllerDelegate

extension ViewController: RCCameraViewControllerDelegate {
    private func scan() {
        let cameraController = RCCameraViewController()
        cameraController.delegate = self
        present(cameraController, animated: true)
    }

    /// 스캔이 끝난 후 decoding 한 message 를 전달.
    func cameraViewController(didFinishScanning message: String) {
        messageLabel.text = message
    }

    /// 스캔이 성공적으로 끝나지 않은 경우 호출.
    func cameraViewControllerDidCancel() {
        print("did cancel")
    }
}

// MARK: - Layout

extension ViewController {
    private func setLayout() {
        // ...
        self.view.addSubview(messageLabel)
        self.view.addSubview(cameraButton)

        // ...

        NSLayoutConstraint.activate([
            messageLabel.topAnchor.constraint(equalTo: imageView.bottomAnchor, constant: 30),
            messageLabel.centerXAnchor.constraint(equalTo: self.view.centerXAnchor)
        ])

        NSLayoutConstraint.activate([
            cameraButton.topAnchor.constraint(equalTo: messageLabel.bottomAnchor, constant: 30),
            cameraButton.centerXAnchor.constraint(equalTo: self.view.centerXAnchor)
        ])
    }
}- 스캔 후 메시지를 반영했습니다. (스캔하지 않고 종료 시
did cancel라고 출력되었습니다.)
Change Configuration
RCCoderConfiguration.shortConfiguration을 사용해서 message 를 제한해보겠습니다.
private func setCode() {
        // 🧌 .shoretConfiguration 에 맞춰서 소문자로만 구성해야 유효한 메시지가 된다.
        var image = RCImage(message: "hello i am hyungyu")
//        let coder = RCCoder()

        // MARK: - custom configuration

        let configuration = RCCoderConfiguration.shortConfiguration
        let coder = RCCoder(configuration: configuration)

        // ...
}

extension ViewController: RCCameraViewControllerDelegate {
    private func scan() {
        let cameraController = RCCameraViewController()
        cameraController.delegate = self

        // MARK: - Custom Configuration

        // .shortConfiguration 이 아니라면 인식되지 않았습니다.
        let configuration = RCCoderConfiguration.shortConfiguration
        let coder = RCCoder(configuration: configuration)

        cameraController.coder = coder

        present(cameraController, animated: true)
    }
}
Handle Errors
RCError.swift 를 통해서 어떤 에러들이 있고 어떻게 핸들링하면 알 수 있습니다.
import Foundation

public enum RCError: String, LocalizedError {
  case invalidCharacter
  case longText
  case decoding
  case wrongImageSize

  public var errorDescription: String? {
    switch self {
      case .invalidCharacter:
        return "message contains character which is not in characterSet"
      case .longText:
        return "message characters count exceeds configuration maximum characters"
      case .decoding:
        return "Error decoding"
      case .wrongImageSize:
        return "Error decoding. Image width and height must be a equal"
    }
  }
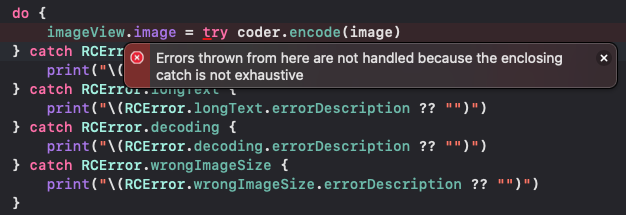
}- 다음과 같이 do-catch 문을 작성했는데 에러가 발생했다.

내가 처리한 오류 처리 이외에도 다른 에러가 날 수 있는 가능 성이 존재해서 이런 것 같다. 그래서 다음과 같이 작성했다.
// MARK: - Error Handling

        do {
            imageView.image = try coder.encode(image)
        } catch RCError.invalidCharacter {

        } catch RCError.longText {

        } catch RCError.wrongImageSize {

        } catch RCError.decoding {

        } catch {
            // catch any other errors
        }
참고:
Mar 05, 2021, TIL (Today I Learned)
Errors thrown from here are not handled for do { } catch in Swift 2.0
'iOS > Open Library' 카테고리의 다른 글
| iOS) RIBs 튜토리얼 2 (0) | 2022.06.17 |
|---|---|
| iOS) RIBs 튜토리얼 1 (0) | 2022.06.02 |
| iOS) Moya custom Plugin 을 통해서 네트워크 연결 실패를 대응해보자 (0) | 2022.04.15 |
| iOS) Moya 에서 Plugin 으로 Token 갱신하기 (0) | 2022.04.11 |
| iOS) Moya 에서 DELETE, PATCH 통신 사용해보기 (0) | 2021.10.04 |
- MVVM
- Protocol
- 서버통신
- github
- watchOS
- APNS
- urlsession
- UserDefaults
- RxCocoa
- Firebase
- WWDC22
- configurable widget
- containerBackground
- SwiftUI
- Objective-C
- YPImagePicker
- Swift
- MOYA
- Notification
- IOS
- Widget
- 2022 KAKAO TECH INTERNSHIP
- WidgetKit
- WWDC
- CloneCoding
- Algorithm
- async/await
- projectsetting
- OpenSourceLibrary
- rxswift
| 일 | 월 | 화 | 수 | 목 | 금 | 토 |
|---|---|---|---|---|---|---|
| 1 | 2 | 3 | 4 | 5 | 6 | |
| 7 | 8 | 9 | 10 | 11 | 12 | 13 |
| 14 | 15 | 16 | 17 | 18 | 19 | 20 |
| 21 | 22 | 23 | 24 | 25 | 26 | 27 |
| 28 | 29 | 30 |
- Total
- Today
- Yesterday
